Frozen Well Pipe: Where It Actually Freezes First, and Why

A frozen well pipe usually doesn’t start where you’d expect. Not the buried line, and not the pipe you spent an afternoon wrapping in foam.
It’s a piece of tubing about as thick as a pencil.
Your pressure switch connects to the plumbing through a short, skinny nipple, often a quarter inch. That tiny bit of pipe holds almost no water, sits out in the air, and has nothing moving through it most of the time. So it freezes before anything else does.
And here’s the part that gets people. When it freezes, the switch can’t read pressure anymore. It can’t read pressure, so it never tells the pump to run. You go to the tap, nothing happens, and you conclude your pump is dead.
Your pump is fine. Your tank is fine. Your buried line is fine. A pencil-width tube full of ice has taken your entire water system offline.
That misdiagnosis is expensive. Thawing a frozen pipe runs $200 to $400 and a new pressure switch is $150 to $300. Replacing a well pump you didn’t need to replace runs $975 to $2,575, national average $1,775.
So before anything else this winter: go look at your pressure switch and find that little tube.
Where a frozen well pipe actually starts, in order
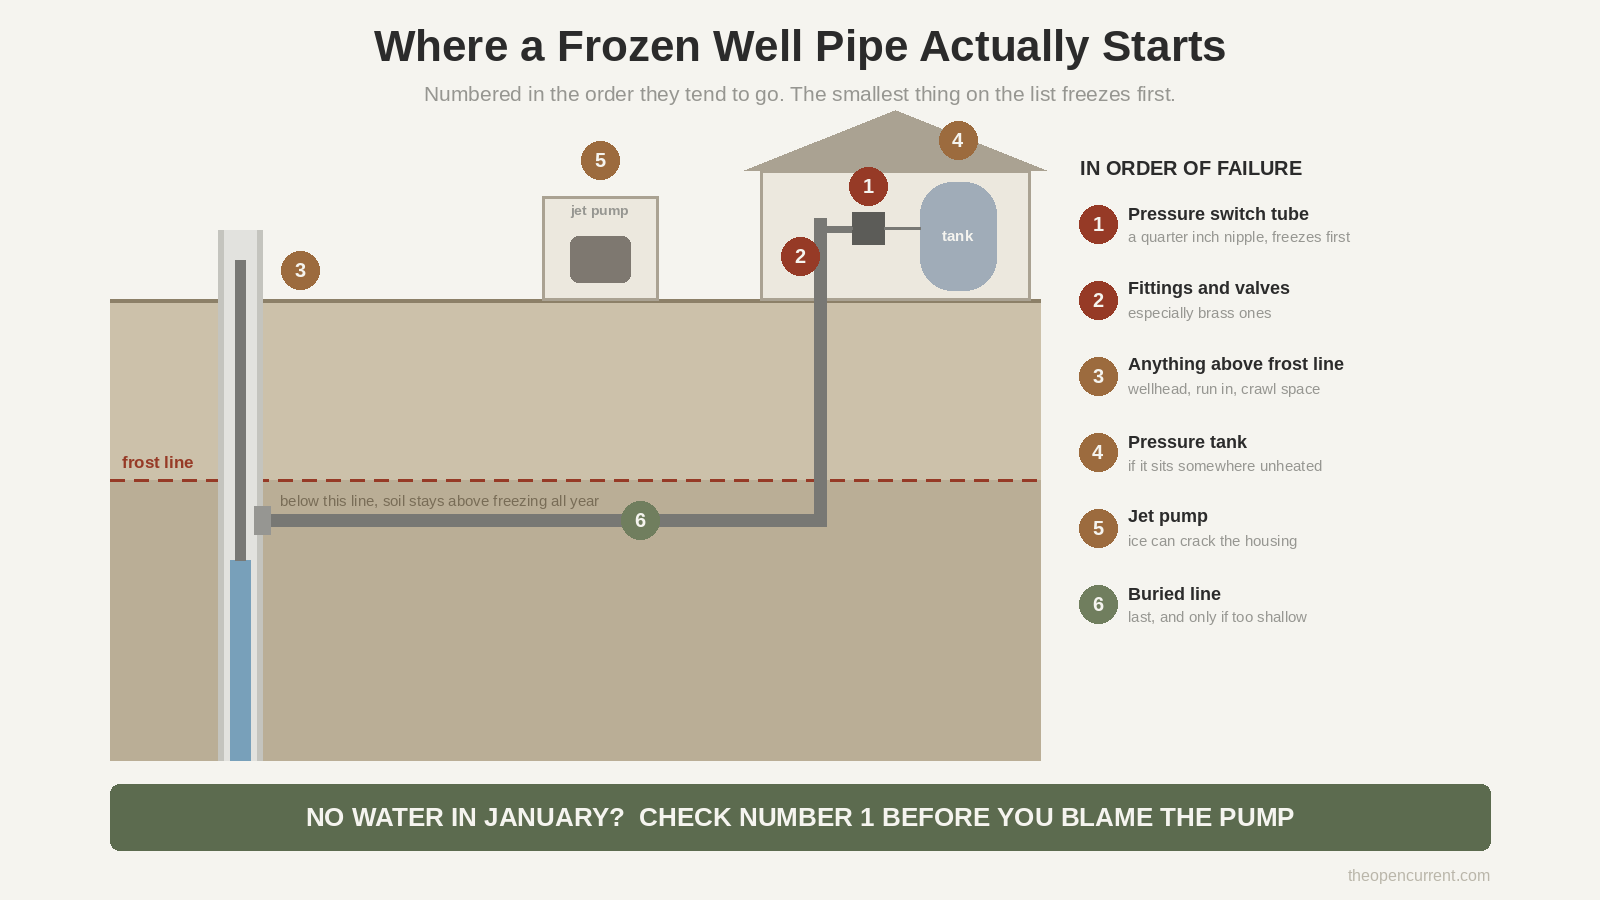
The vulnerable spots aren’t evenly vulnerable. Roughly in the order they’ll bite you:
The pressure switch tube. Covered above. Smallest volume of water, most exposed, freezes first.
Fittings and valves, especially brass ones. There’s a guy on the solar-electric forum who built an insulated closet around his entire water system and wrapped all the pipes, and it still burst. At the brass valves. Fittings are bulkier and more awkward to wrap than straight pipe, so they tend to be where the insulation job quietly stops. Doing 90% of the work and getting none of the benefit.
Anything above the frost line. The wellhead, the run into the building, whatever’s in a crawl space.
The pressure tank itself, if it’s somewhere unheated.
Jet pumps. More on these in a minute, because they’re a category of their own.
The buried line, which is usually last, and only if it was buried too shallow in the first place.
Original diagram. Reuse it with a link to theopencurrent.com.
The real answer is depth, not insulation
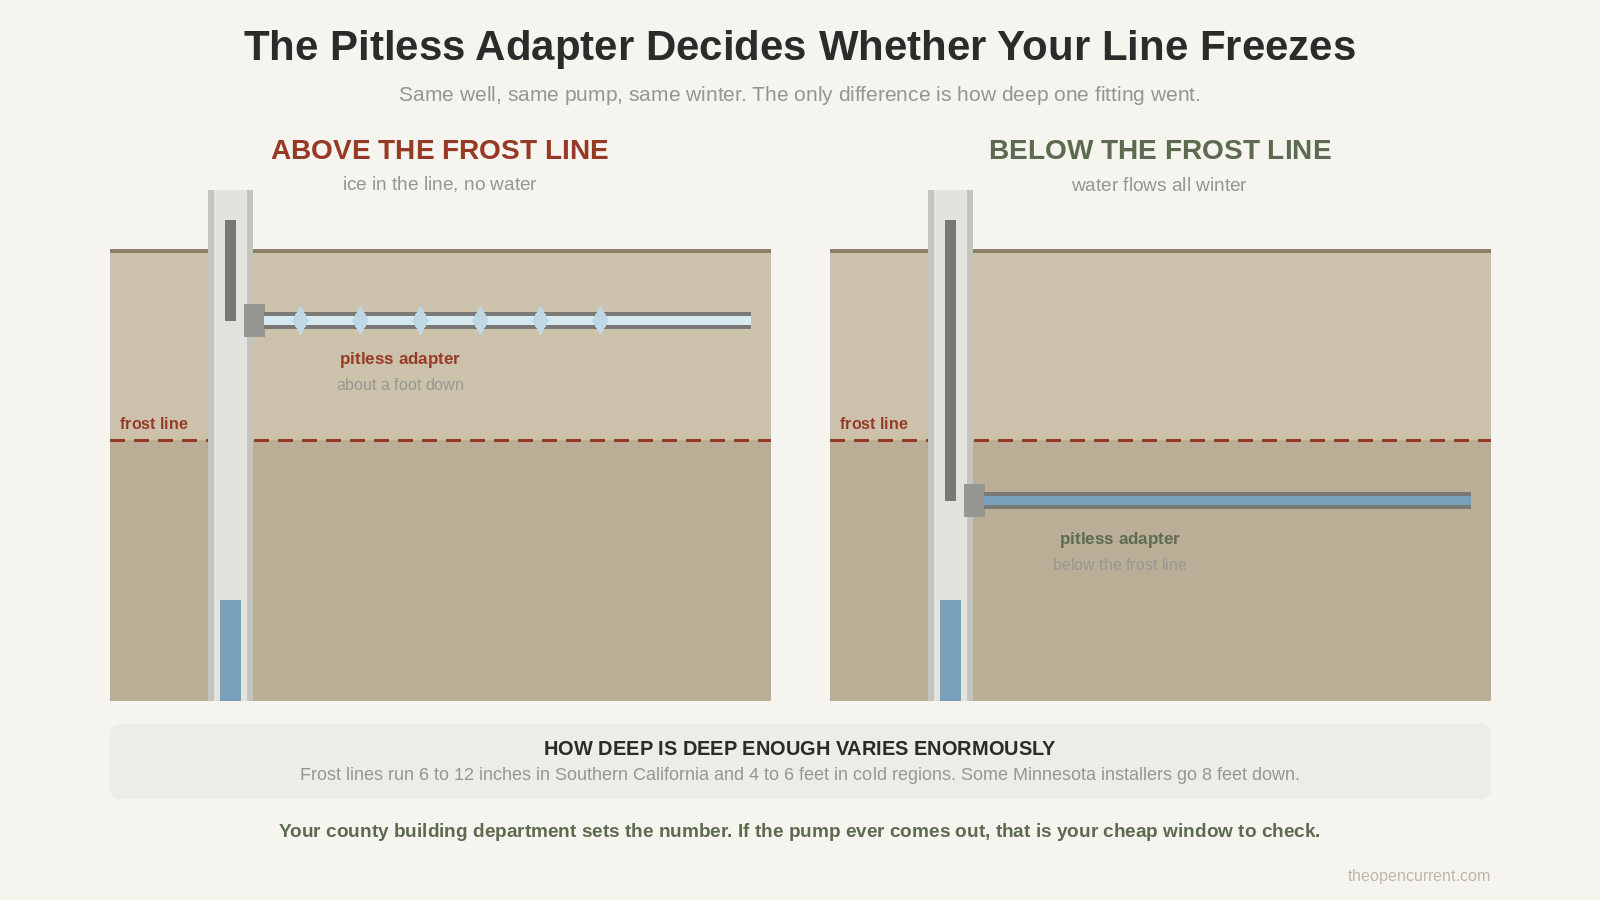
Here’s the thing that reframes this whole topic. Below the frost line, soil stays above freezing all year. Every single freeze problem you’ll ever have is a thing sitting above that line.
So the question isn’t really “how do I insulate all this.” It’s “what’s above the line that shouldn’t be, and can I get it below.”
The frost line varies wildly. Southern California runs 6 to 12 inches. Plenty of cold regions run 4 to 6 feet. In Two Harbors, Minnesota, installers put things eight feet down. Your local building department knows the number for your county, and it’s a free phone call.
The pitless adapter, which is doing more work than you think
The component that gets your water line below the frost line is called a pitless adapter. It’s a fitting bolted through the side of your well casing, underground, and it does two jobs at once.
It routes water from the vertical drop pipe coming up from your submersible pump over to the horizontal line heading to the house. And it seals the casing where that pipe crosses through, so surface water, dirt and bacteria can’t get into your well.
Old wells used a pit or vault around the wellhead instead. The pitless adapter replaced that, which is where the name comes from. If you’ve got a drilled well with a submersible pump, you almost certainly have one, and you’ve probably never seen it, because it’s a foot or more underground.
And a really common cause of a frozen well pipe is that it went in too shallow.
There’s a guy on the Small Cabin Forum who had a submersible system professionally installed at his cabin, and the pitless adapter went in about a foot down in the casing. Above his frost line. Professional install, freeze problem baked in from day one, discovered the following January.
On InspectAPedia, the standard reply to freeze complaints is basically: your pitless adapter probably isn’t below the frost line. It’s that common.
The one cheap window to fix it
An adapter costs $50 to $150 depending on whether it’s brass or stainless. Installing one runs $500 to $1,500, and almost all of that is labor, because somebody has to excavate around the casing and pull the pump.
But if the pump is already coming out, adding or relocating one is barely any extra cost.
That’s the practical takeaway. If you ever have that pump out for any reason, replacement, repair, whatever, that is your moment. Ask about the pitless adapter depth while the hole is open and the pump is on the grass. Miss it and you’re paying for the same excavation and the same pump pull twice.
Same logic on the O-rings. Replace them whenever the pump is out, because a worn seal down there is a slow leak you will never see.
Retrofitting one into an existing system is doable, and one driller describes it as typically a one day job.
Original diagram. Reuse it with a link to theopencurrent.com.
How to spot a leaking adapter
Quick diagnostic while we’re here, because it’s easy and it takes five seconds.
If your pitless adapter’s seal is going, you’ll see water bubbling up around the well casing after the pump runs. That’s it. That’s the tell. It’s visible from standing height and it costs you nothing to look.
The off-grid problem with the standard advice
Right, this is the bit that’s specific to us.
Heat tape is the standard tool here. Wrap the vulnerable stuff in an electric heating cable, plug it in, done. On grid that’s a line on a power bill you probably don’t examine too closely.
Off grid, heat tape is a continuous electrical load running in December. Let’s do the math, because the numbers are worse than you’d guess.
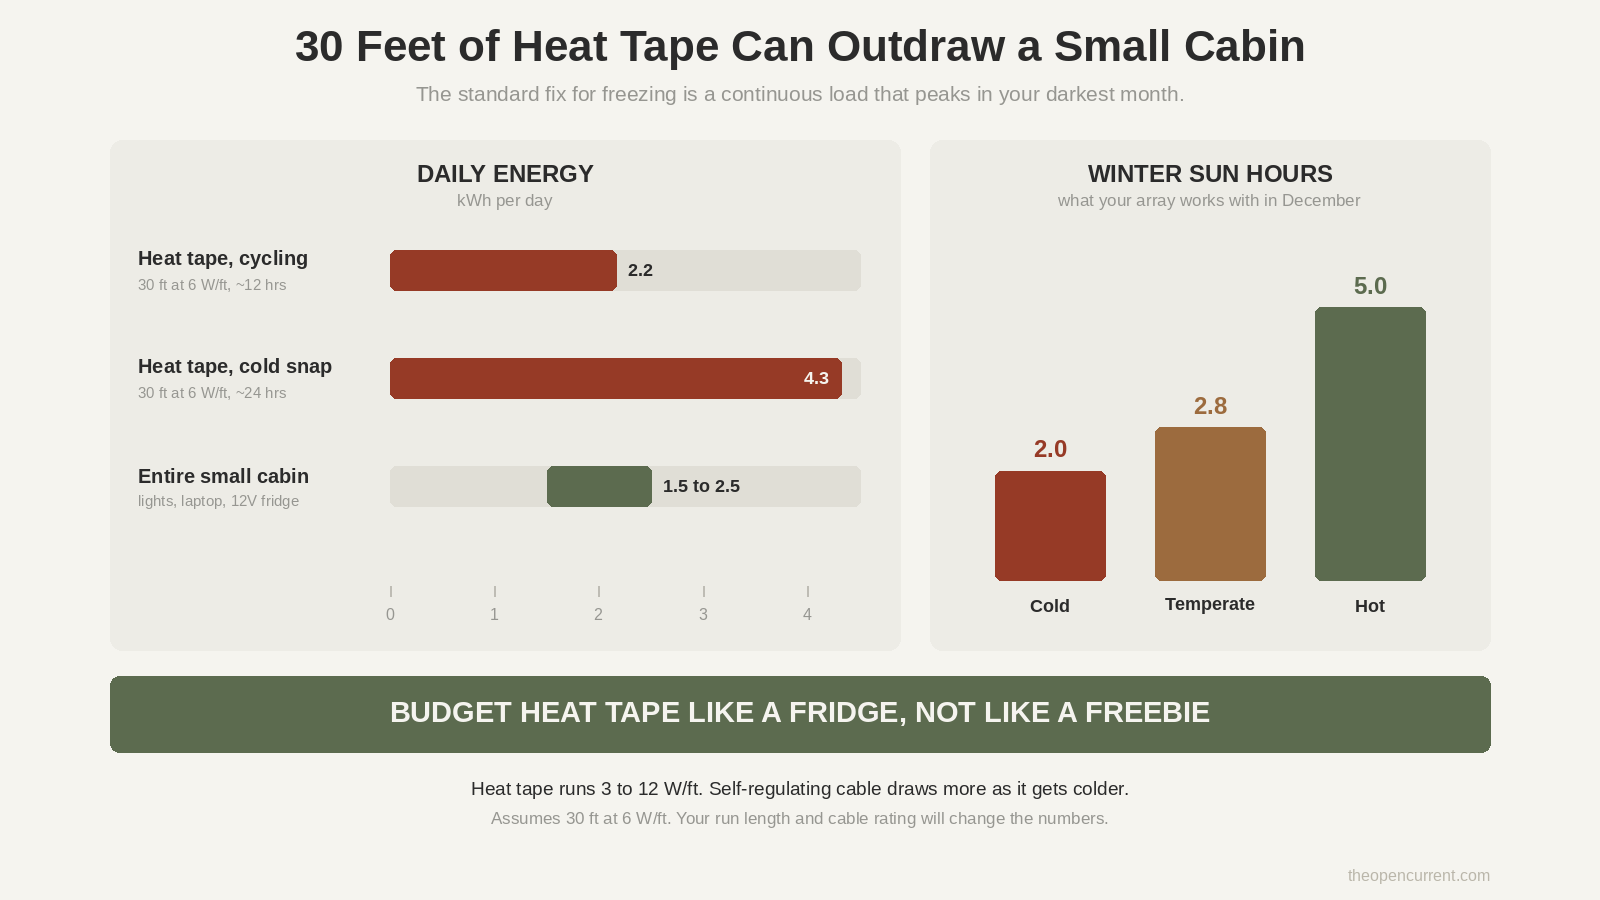
Heat tape runs 3 to 12 watts per foot, with most residential cable rated 6 to 9. Self-regulating cable draws more as it gets colder, up to around 10 W/ft near freezing, which is a lovely feature right up until you’re the one generating the power.
So say you’ve got 30 feet protecting your wellhead, the run into the building and the pressure switch area. At 6 W/ft that’s 180 watts. Thermostatically cycling maybe 12 hours a day in a real winter, that’s roughly 2.2 kWh a day. In a sustained cold snap where it barely cycles off, more like 4.3.
Now put that next to your actual system. A small cabin running lights, a laptop and a 12V fridge uses somewhere around 1,500 to 2,500 Wh a day.
Read that twice. Thirty feet of heat tape can draw more power than everything else in the cabin combined. On a full homestead at 8 to 15 kWh a day it’s still 15 to 27% of your total, which is not nothing.
And it runs in December, when your array is working on winter sun hours of maybe 2 to 2.8 a day instead of summer’s five.
So the standard fix for freezing is a load that peaks precisely when your production bottoms out. Oof.
That doesn’t mean never use heat tape. It means budget for it in your power system the way you’d budget for a fridge, rather than treating it as a free afterthought. If you want to see what it does to your numbers, drop it into the off-grid cost calculator as a continuous load and watch your array size move.
Original diagram. Reuse it with a link to theopencurrent.com.
Jet pumps are a different level of exposed
Worth separating these out, because the consequences aren’t comparable.
A submersible pump sits down the well, underwater, below the frost line. It’s about the best protected thing on your property.
A jet pump sits above ground, usually in a pump house or a basement, full of water. When one freezes solid, expanding ice can crack the housing, and on the cast iron bodies that’s generally past repairing. You’re buying a new pump.
So if you’re running a jet pump on a shallow well, your freeze risk is in a different category from your neighbor with a submersible, and your protection needs to reflect that. I went through the differences between the two in the submersible well pump guide.
When you can’t get deep enough: drain back
Some properties you just can’t bury things deep enough. Bedrock, a cabin on a slope, a system that was built before anyone thought about it.
The answer there is to make sure there’s no water sitting in the vulnerable section when the pump isn’t running. That’s drain back, and there’s some seriously clever engineering on the solar-electric forum for it.
The approach: tap the pitless adapter to a quarter inch, fit a small check valve with roughly a one eighth inch restrictor hole so the pipe drains rather than just circulating water, and pair it with a normally open solenoid valve near the tank. The valve closes while the pump runs and opens when it stops.
The guy explaining it calls the solenoid “the thumb on the straw,” which is a perfect description. Let go of the straw and the column drains back down the well.
And there’s a neat bit of physics in it. It works if your static water level is within about ten feet of the surface, because only the column of water above static level counts toward the pressure holding it up. Your pump can be a hundred feet down and it doesn’t matter.
The catch, and it’s a big one. A bleed back or drain back system fails silently. There’s a thread on a plumbing forum where a well had one fitted, a check valve failed, and nobody knew a thing about it until the whole run froze solid that winter. The system that was supposed to protect them had been broken for months.
So if you have one, get it verified before the season rather than discovering its condition in January.
How to winterize a well you’re leaving empty
Different problem, and much simpler. If you’re shutting a cabin down for the season rather than living through it, you’re not protecting water, you’re removing it.
Broadly: kill power to the pump at the breaker, shut off the supply to the building, then open every tap and flush the toilets until nothing more runs out. You want the lines empty, not slightly full.
Worth being thorough about low points, traps and anything with a bowl or a reservoir, because that’s where the leftover water hides. And a cracked fitting from a cabin sat empty all winter doesn’t announce itself in March. It announces itself the first time you pressurize the system in May, usually while you’re standing in it.
Two small things that aren’t about freezing at all
Mark your wellhead. A fiberglass driveway marker means you can find it under three feet of snow. The Water Systems Council recommends it, and it’s the kind of thing that sounds obvious right up until the January you can’t find your own wellhead.
Protect it from the plow. Snowblowers and plows wreck wellheads every winter, and that’s a winter failure that has nothing to do with ice at all. If yours is anywhere near where you clear snow, mark it and give it room.
What it costs when it goes wrong
| Job | Typical cost |
|---|---|
| Thawing a frozen pipe | $200 to $400 |
| Pressure switch replacement | $150 to $300 |
| Electrical troubleshooting | $150 to $500 |
| Pressure tank work | $250 to $800 |
| Well pump repair | $373 to $1,622, averaging $974 |
| Well pump replacement | $975 to $2,575, averaging $1,775 |
| Pitless adapter installed | $500 to $1,500 |
The interesting thing about that list is the gap between the top and the bottom. The difference between correctly diagnosing a frozen pressure switch tube and wrongly concluding your pump is dead is roughly $1,500.
One more thing while we’re talking about tanks. People assume a big pressure tank means a big buffer of water. It doesn’t. You typically get 10 to 15% of tank volume out before the pump kicks in, and 25% at absolute best with the air charge set right. A 450 gallon tank is mostly air by design. Worth knowing before you plan your winter around it, and I covered how that sizing actually works in the pressure tank guide.
Questions worth answering before it gets cold
- How deep is my pitless adapter, and what’s my local frost line? The building department has the second number.
- Is my supply line below the frost line for the whole run, or does it come shallow anywhere?
- Where does the line enter the building, and is that section heated?
- Do I have a bleed back or drain back system, and has anyone actually checked it works?
- Submersible or jet pump? That decides how bad a freeze gets.
- Where’s my pressure switch, and is that quarter inch tube insulated?
- If I lose water in January, do I know where the shutoff is and can I reach it?
- Can I find my wellhead under snow?
Most of those are ten minute answers, and they’re a lot easier to get in September than in a cold snap with a flashlight in your teeth.
FAQ
Why is my well pump frozen but the pump seems fine? Probably because it isn’t the pump. The small tube feeding your pressure switch freezes before anything else, and once it does the switch can’t sense pressure and never calls for the pump. No water, no fault, nothing actually broken.
How deep should a water line be buried? Below your local frost line, which ranges from under a foot in mild climates to six feet or more in cold ones. Your county building department sets the requirement.
Can I install a pitless adapter on an existing well? Yes, and drillers do it regularly for frost protection. It means excavating around the casing and pulling the pump, so budget $500 to $1,500, and try to combine it with pump work you were doing anyway.
Is heat tape enough on its own? Sometimes, and not always. One forum account had heat tape plus 200 watts of heat around a booster pump and the outlet hose to the pressure switch froze regardless. Heat tape also needs power, and off grid that load lands in your darkest month.
Do submersible pumps freeze? The pump itself rarely does, because it sits down the well below the frost line. What freezes is everything between it and your tap. Jet pumps are the vulnerable ones, and a frozen jet pump usually cracks beyond repair.
How do I know if my pitless adapter is leaking? Water bubbling up around the well casing after the pump runs.
What should I do first? Find your pressure switch and look at the skinny tube connecting it to the plumbing. That’s the highest return five minutes available to you before winter.
Where to go next
- Off-grid water systems. How wells, catchment and hauled water compare once you’re living with them.
- Well pump replacement cost. What replacement actually runs, and how to tell whether you need one.
- Well drilling cost. What it takes to put a well in, including the dry hole risk.